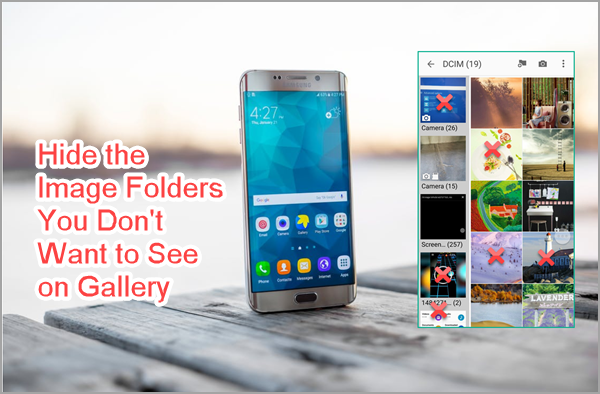
Many Android users hope that their Gallery app could be smart enough to know which images to show in Gallery, because the app is somewhat too powerful that it can find all photos in mobile phone, which is a headache in some conditions. Actually, we may easily make it happen by ourselves. In this tutorial, we are going to learn how to stop gallery from scanning a folder, thus hide images in the folder from gallery app, or choose which images to show in Gallery with a third-party gallery app.
Why You May Need to Stop Gallery from Scanning a Folder
- Don’t want other people to find sensitive pictures in Gallery when you lend out your phone.
- Don’t want to view meaningless images in gallery, like icons from game apps.
Method 1. Hide Pictures on Android without App
Actually, it is almost impossible to finish such a task without any app, but it only requires a file manager app (which is a must-have in each Android phone) in this method. Depending on the specific operation, we can use 3 options to achieve the same target.
Option 1. Add “.” to Folder Name with Stock File Manager
The system will skip folders with a “.” in the start of name when scanning for media which will be shown in gallery. The built-in file manager app is good to go.
Step 1. Use file manager app to find the folder that contains image(s) you want to hide.
Step 2. Long-press on the folder, then choose Rename from the menu.
Step 3. Add “.” (without quotes) to the beginning of the original file name.
Step 4. Tap OK to confirm.
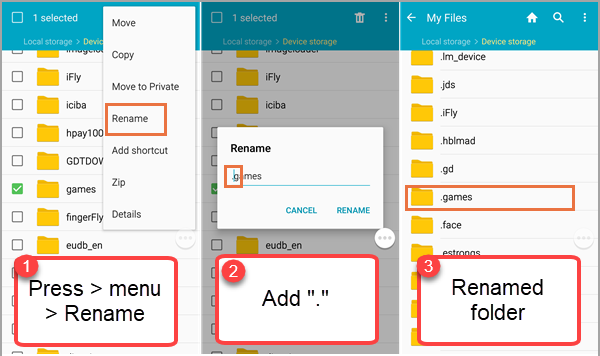
All images (existing and those to be created in the future) in the renamed folder will be excluded from Gallery. If you want to reverse, just remove “.” from folder name.
This works best for hiding all pictures from some apps. If you just don’t want to view some existing images, you may create a new folder with “.” in the folder name, and then move the images to the folder.
Notes:
- To find the folder path of Gallery image: if your Gallery supports Album mode, just find the same folder in file manager. If not, find “Path” information of each image in full view page.
- The setting of hiding and unhiding will be carried out in next media scan, which usually takes seconds. In order to speed up the process, you may restart the device.
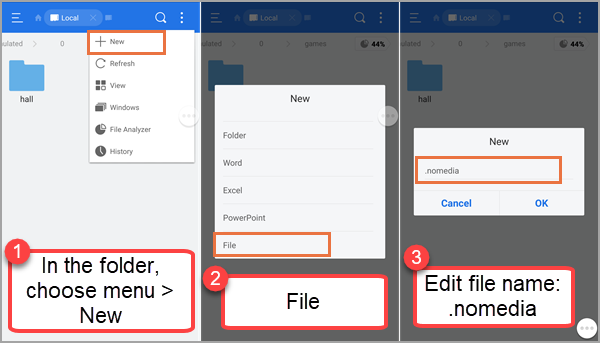
Option 2. Create .nomeida File in Folder with ES File Manager
Alternatively, you can also create a new file “.nomedia” in the folder, which will tell system to skip the folder when scanning for media. Since most file manager apps don’t allow users to create new file, the choice is limited. According to our tests, ES File Explorer can do the trick.
Step 1. Open ES File Manager, then open the folder you want to hide images from.
Step 2. Tap the menu icon, then choose New > File.
Step 3. Edit file name as “.nomedia” (without quotes).
Step 4. Tap OK to confirm.
To unhide images in the folder from gallery, just deleted the .nomedia file from the folder.
Option 3. Exclude a Folder from Media Scan with OI File Manager
This option has few difference from Option 2, so you may skip it if any one of the above two options works for you.
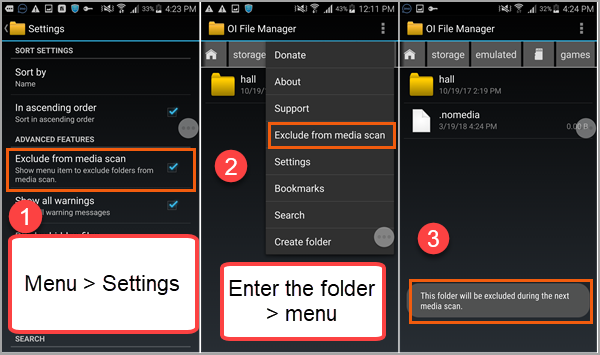
Step 1. Open OI File Manager, then tap the menu icon in the top-right and choose Settings.
Step 2. Tick Exclude from media scan, which is disabled by default.
Step 3. Go back the directory screen, and then enter the folder you want to exclude.
Step 4. Tap the menu icon, then choose Exclude from media scan.
Step 5. The app will say “This folder will be excluded during the next media scan.”
Actually, at the same time, a new folder “.nomedia” is created in the folder which is similar to.
Option 2. To reverse the setting, just choose Include from media scan in Step 4.
Note: It is not suggested to hide/show image files or folders from gallery with two or more methods at the same time to avoid messing up gallery.
Method 2. Choose Which Images to Show with QuickPic
Many people refuse to move to another third-party gallery app, but you may change the idea if you can control the filtering from both ends. Yes, with QuickPic, you can not only choose which folder to exclude from gallery, but also which folder to include. For example, let’s go to an extreme. If you choose a folder without any media as Included folders, then you won’t view any image/video in the app.
Step 1. Open QuickPic, choose menu > Settings > Browse.
Step 2. Tap Included folders > Add icon “+”.
Step 3. Select a folder that you want to include to media scan. Repeat the operation to add more folders to the list.
Step 4. Back to Home screen, and it should only show images from the folders you added.

Tip: You can also try the excluding function if there are only several folders you want to hide.
Of course, the settings don’t affect other gallery apps on the phone, which may reduce the attraction for some people. It would be perfect if those guys can make QuickPic as the only gallery in the device, such as by disabling or hiding other equivalent apps.